
Ansible is one of the most popular configuration management and automation server used world wide. In this tutorial we will learn how to install Ansible on CentOS, Rhel,Ubuntu. Ansible can be installed on any unix based system. Once we have our Ansible server ready, we will configure our ansible server to access and manage windows and linux servers.
Install Ansible on Rhel and CentOs
We need to setup epel-release repository to install ansible on CentOS and RHEL.
#yum update#yum install epel-release#yum install ansible# ansible --version
ansible 2.9.27
config file = /etc/ansible/ansible.cfg
configured module search path = [u'/root/.ansible/plugins/modules', u'/usr/share/ansible/plugins/modules']
ansible python module location = /usr/lib/python2.7/site-packages/ansible
executable location = /usr/bin/ansible
python version = 2.7.5 (default, Nov 16 2020, 22:23:17) [GCC 4.8.5 20150623 (Red Hat 4.8.5-44)]Installation of Ansible on Ubuntu
Lets update the apt repository first
sudo apt updateLets install required packages for ansible
sudo apt install software-properties-commonAlso we need to add ansible PPA apt repository
sudo apt-add-repository --yes --update ppa:ansible/ansibleNow we can finally install ansible on ubuntu
sudo apt install ansibleansible --versionInstallation and Configuration of ssh and winrm for managing linux and windows servers
We have setup our Ansible server , now we need to setup winrm for connecting windows servers as they are not accessible on port 22 (ssh).
For installing winrm on Rhel and CentOs
yum install python2-winrmFor installing winrm on ubuntu
sudo apt install python3-winrmFor winrm to work and ansible to access and manage windows servers, we need to execute below script as an Administrator using Powershell. You can copy the script on windows server , right click and run as Administrator.
We need to create a public and private key using ssh-keygen and we will copy the public key on all the linux servers we need to manage.
$ ssh-keygen
Generating public/private rsa key pair.
Enter file in which to save the key (/home/ved/.ssh/id_rsa):
Created directory '/home/ved/.ssh'.
Enter passphrase (empty for no passphrase):
Enter same passphrase again:
Your identification has been saved in /home/ved/.ssh/id_rsa.
Your public key has been saved in /home/ved/.ssh/id_rsa.pub.
The key fingerprint is:
SHA256:CNjCpIaE8WU/dGvwRvGn78YjAb8Gbz7J+nmEFgXs29k [email protected]
The key's randomart image is:
+---[RSA 2048]----+
|oo. o o +o..     |
|+= = o = o. .    |
|o.= o o =....    |
|.  . . =. oo     |
|      . So.= o   |
|        . *.+ E  |
|         = *.    |
|          Xo=    |
|        .*+=..   |
+----[SHA256]-----+
We need to copy the public key on all the server to $HOME/.ssh/authorized_keys so that we can access those servers password less. You can replace the name of your user with root.
scp .ssh/id_rsa.pub [email protected]:/root/.ssh/authorized_keysHurrah!! our Ansible server is configured and ready to use.
Ansible ad-hoc commands and modules
For using ansible ad-hoc command or for running playbooks (collection of plays), we need to add our remote or manage server in /etc/ansible/hosts file. We will now add a linux and windows servers to ansible hosts declaration file.
Note: window servers doesnt use ssh and hence we need to use winrm for communication and winrm needs below parameters to be defined for Ansible to connect them.
vi /etc/ansible/hosts


[linux]
10.23.91.38

[win]
192.168.0.197

[win:vars]
ansible_user=Administrator
ansible_password=redhat@123
ansible_connection=winrm
ansible_winrm_server_cert_validation=ignore
Ansible execution and test
Since our hosts file is ready with basic configuration, now we can try to test whether we are able to ping our servers.
First we will try to ping our linux server using ansible ping module
# ansible linux -m ping
10.23.91.38 | SUCCESS => {
    "ansible_facts": {
        "discovered_interpreter_python": "/usr/bin/python3"
    },
    "changed": false,
    "ping": "pong"
}
Thats Great, we are able to ping our Linux server from Ansible control server.
Lets try to ping our window server using winrm ping module.
# ansible win -m win_ping
192.168.0.197 | SUCCESS => {
    "changed": false,
    "ping": "pong"
}
All the effort we made is now showing results. Ansible server is now able to ping windows server.
Ansible configuration management
Since we have successfully done the basic connectivity using ping. Its time to do some configuration using Ansible on windows servers.
Lets create a Ansible playbook using which we can create a user on windows server. You can use your favourite editor , i am using vim for creating the playbook.
# vi create-user.yml---
- name: "Create New user on Windows Machine"
hosts: win
tasks:
- name: "Check Windows machines access using win_ping"
win_ping:
when: ansible_os_family == 'Windows'
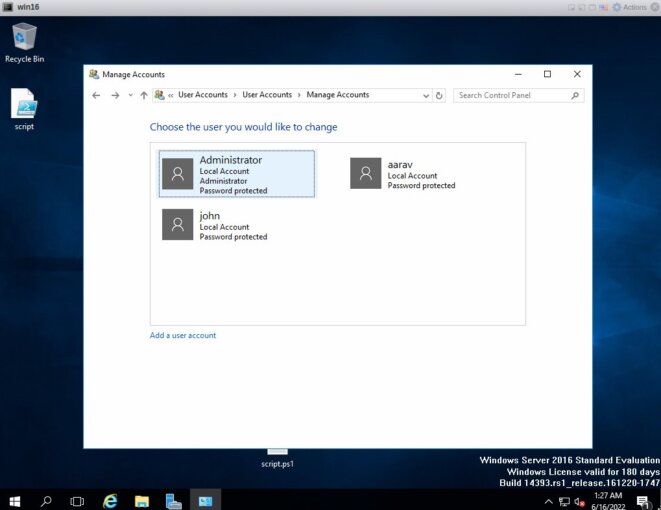
- name: Create a new User
win_user:
name: aarav
password: MyPassword#123
state: present
groups:
- Users
when: ansible_os_family == 'Windows'
Lets run the create-user.yml playbook from our Ansible server.
# ansible-playbook create-user.yml -e win

PLAY [Create New user on Windows Machine] **************************************

TASK [Gathering Facts] *********************************************************
ok: [192.168.0.197]

TASK [Check Windows machines access using win_ping] ****************************
ok: [192.168.0.197]

TASK [Create a new User] *******************************************************
changed: [192.168.0.197]

PLAY RECAP *********************************************************************
192.168.0.197              : ok=3    changed=1    unreachable=0    failed=0    skipped=0    rescued=0    ignored=0
Our playbook executed perfectly and has created a User on the windows server.
Lets try another playbook for creating a folder on windows server.
#vi createfolder.yml#---
-
hosts: win
tasks:
-
name: create folders
win_file:
path: "C:\\Temp\\folder\\Vedkumar"
state: directoryWe will now run above playbook to create a folder at given path on the windows server.
# ansible-playbook createfolder.yml -e win

PLAY [win] *********************************************************************

TASK [Gathering Facts] *********************************************************
ok: [192.168.0.197]

TASK [create folders] **********************************************************
changed: [192.168.0.197]

PLAY RECAP *********************************************************************
192.168.0.197              : ok=2    changed=1    unreachable=0    failed=0    skipped=0    rescued=0    ignored=0
Brilliant!!, now you can login to your windows server and check the path and you will find the new directory created on your windows server.
Conclusion
Ansible is so popular that we can install ansible on linux server quite easily. In this tutorial, we have learned how to install Ansible on CentoS , Rhel and Ubuntu. We have configured Ansible to access and manage linux as well as windows server and Finally we created some playbooks using which we created user and folder on remote windows server. Stay tuned for more such howto’s.