We will deploy Multi Master Kubernetes cluster setup using Kubeadm on ubuntu 16.04 with HA load balancer for Master servers.
What is Kubeadm ?
Kubeadm is a tool built to provide kubeadm init and kubeadm join as best-practice “fast paths” for creating Kubernetes clusters. kubeadm performs necessary actions to setup and configure Kubernetes cluster. Kubeadm is designed to bootstrap the cluster , it doesnt provision machines.
Pre-requisite for Multi Master Kubernetes cluster setup using Kubeadm
For this demo, we will use 3 master and 2 worker node to create a multi master Kubernetes cluster using kubeadm tool. Below are the pre-requisite requirements for the installation:
• 3 machines for master, ubuntu 16.04+, 2 CPU, 2 GB RAM, 10 GB storage
• 2 machines for worker, ubuntu 16.04+, 1 CPU, 2 GB RAM, 10 GB storage
• 1 machine for loadbalancer, ubuntu 16.04+, 1 CPU, 2 GB RAM, 10 GB storage
• All machines must be accessible on the network. If you are deploying on cloud, make sure all the machines are created in a Single VPC.
• sudo privilege
• ssh access from loadbalancer node to all machines (master & worker).
Setting up loadbalancer
At this point we will work only on the loadbalancer node. In order to setup loadbalancer, you can leverage any loadbalancer utility of your choice. If you feel like using cloud based TCP loadbalancer, feel free to do so. There is no restriction regarding the tool you want to use for this purpose. For our demo, we will use HAPROXY as the primary loadbalancer.
What are we loadbalancing ?
We have 3 master nodes. Which means the user can connect to either of the 3 api-servers. The loadbalancer will be used to loadbalance between the 3 api-servers.
Now that we have some information about what we are trying to achieve, we can now start configuring our loadbalancer node.
• Login to the loadbalancer node
• Switch as root – sudo -i
• Update your repository and your system
sudo apt-get update && sudo apt-get upgrade -yInstall Haproxy
sudo apt-get install haproxy -y
Edit haproxy configuration
vi /etc/haproxy/haproxy.cfg
#Add the below lines to create a frontend configuration for loadbalancer -
frontend fe-apiserver
bind 0.0.0.0:6443
mode tcp
option tcplog
default_backend be-apiserver
#Add the below lines to create a backend configuration for master1 and master2 nodes #at port 6443. Note : 6443 is the default port of kube-apiserver
backend be-apiserver
mode tcp
option tcplog
option tcp-check
balance roundrobin
default-server inter 10s downinter 5s rise 2 fall 2 slowstart 60s maxconn 250 maxqueue 256 weight 100
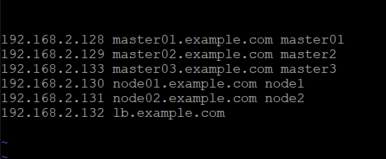
server master01 192.168.2.128:6443 check
server master02 192.168.2.129:6443 check
server master03 192.168.2.133:6443 checkHere – master01, master02 and master03 are the names of the master nodes and 192.168.2.128 , 192.168.2.129 and 192.168.2.133 are the corresponding internal IP addresses.
Restart and Verify Haproxy
systemctl restart haproxy
systemctl status haproxy
Ensure haproxy is in running status.
Run nc command as below –
nc -v localhost 6443
Connection to localhost 6443 port [tcp/*] succeeded!
Note If you see failures for master01 , master02 and master03 connectivity, you can ignore them for time being as we have not yet installed anything on the servers.
Install kubeadm,kubelet and docker on master and worker nodes
- In this step we will install kubelet and kubeadm on the below nodes
- master01
- master02
- master03
- node01
- node02
- Perform below steps on all the below nodes.
- • Log in to all the 5 machines as instructed
Switch as root - sudo -i
Update the repositories
# apt-get update
Turn off swap
# swapoff -a
#sudo sed -i '/ swap / s/^\(.*\)$/#\1/g' /etc/fstab
Install kubeadm and kubelet
#apt-get update && apt-get install -y apt-transport-https curl

#curl -s https://packages.cloud.google.com/apt/doc/apt-key.gpg | apt-key add -

#cat <<EOF >/etc/apt/sources.list.d/kubernetes.list
deb https://apt.kubernetes.io/ kubernetes-xenial main
EOF

#apt-get update

#apt-get install -y kubelet kubeadm

#apt-mark hold kubelet kubeadm
Install container runtime – Docker
#sudo apt-get update

#sudo apt-get install -y \
    apt-transport-https \
    ca-certificates \
    curl \
    gnupg-agent \
    software-properties-common

#curl -fsSL https://download.docker.com/linux/ubuntu/gpg | sudo apt-key add -

#sudo add-apt-repository \
   "deb [arch=amd64] https://download.docker.com/linux/ubuntu \
   $(lsb_release -cs) \
   stable"

#sudo apt-get update

#sudo apt-get install docker-ce docker-ce-cli containerd.io -y
After installing Docker runtime, Do below configuration on all nodes except the loadbalancer
Problem: failed to run Kubelet: misconfiguration: kubelet cgroup driver: “systemd” is different from docker cgroup driver: “cgroupfs””
solution: We need to create a file /etc/docker/daemon.json with below configuration
vi /etc/docker/daemon.json
{
"exec-opts": ["native.cgroupdriver=systemd"],
"log-driver": "json-file",
"log-opts": {
"max-size": "100m"
},
"storage-driver": "overlay2",
"storage-opts": [
"overlay2.override_kernel_check=true"
]
}
mkdir -p /etc/systemd/system/docker.service.d
systemctl daemon-reload
systemctl restart docker
Configure kubeadm to bootstrap the cluster
We will start off by initializing only one master node. For this demo, we will use master01 to initialize our first control plane.
• Log in to master01
• Switch to root account – sudo -i
• Execute the below command to initialize the cluster –
#kubeadm init --control-plane-endpoint "LOAD_BALANCER_DNS:LOAD_BALANCER_PORT" --upload-certs --pod-network-cidr=192.168.0.0/16
Here, LOAD_BALANCER_DNS is the IP address or the dns name of the loadbalancer. I will use the dns name of the server, i.e. loadbalancer as the LOAD_BALANCER_DNS. In case your DNS name is not resolvable across your network, you can use the IP address for the same.
The LOAD_BALANCER_PORT is the front end configuration port defined in HAPROXY configuration. For this demo, we have kept the port as 6443.
The command effectively becomes –
#kubeadm init --control-plane-endpoint "lb.example.com:6443" --upload-certs --pod-network-cidr=192.168.0.0/16Your output should look like below –
To start using your cluster, you need to run the following as a regular user:
#mkdir -p $HOME/.kube
sudo cp -i /etc/kubernetes/admin.conf $HOME/.kube/config
sudo chown $(id -u):$(id -g) $HOME/.kube/config

You should now deploy a pod network to the cluster.
Run "kubectl apply -f [podnetwork].yaml" with one of the options listed at:
  https://kubernetes.io/docs/concepts/cluster-administration/addons/

You can now join any number of the control-plane node running the following command on each as root:

kubeadm join lb.example.com:6443 --token cnslau.kd5fjt96jeuzymzb \
--discovery-token-ca-cert-hash sha256:871ab3f050bc9790c977daee9e44cf52e15ee37ab9834567333b939458a5bfb5 \
--control-plane --certificate-key 824d9a0e173a810416b4bca7038fb33b616108c17abcbc5eaef8651f11e3d146

Please note that the certificate-key gives access to cluster sensitive data, keep it secret!
As a safeguard, uploaded-certs will be deleted in two hours; If necessary, you can use
"kubeadm init phase upload-certs --upload-certs" to reload certs afterward.

Then you can join any number of worker nodes by running the following on each as root:

kubeadm join lb.example.com:6443 --token cnslau.kd5fjt96jeuzymzb \
--discovery-token-ca-cert-hash sha256:871ab3f050bc9790c977daee9e44cf52e15ee37ab9834567333b939458a5bfb5
There are 3 major tasks that needs to be performed:
- Setup kubeconfig using –
mkdir -p $HOME/.kube
sudo cp -i /etc/kubernetes/admin.conf $HOME/.kube/config
sudo chown $(id -u):$(id -g) $HOME/.kube/config
2. Setup new control plane (master) using
kubeadm join lb.example.com:6443 --token cnslau.kd5fjt96jeuzymzb \
--discovery-token-ca-cert-hash sha256:871ab3f050bc9790c977daee9e44cf52e15ee37ab9834567333b939458a5bfb5 \
--control-plane --certificate-key 824d9a0e173a810416b4bca7038fb33b616108c17abcbc5eaef8651f11e3d146
3. Join worker node using
kubeadm join lb.example.com:6443 --token cnslau.kd5fjt96jeuzymzb \
--discovery-token-ca-cert-hash sha256:871ab3f050bc9790c977daee9e44cf52e15ee37ab9834567333b939458a5bfb5
NOTE
Your output will be different than what is provided here. While performing the rest of the demo, ensure that you are executing the command provided by your output and dont copy and paste from here.
Save the output in some secure file for future use.
• Log in to master02
• Switch to root – sudo -i
• Check the command provided by the output of master1
You can now use the below command to add another node to the control plane –
kubeadm join lb.example.com:6443 --token cnslau.kd5fjt96jeuzymzb \
--discovery-token-ca-cert-hash sha256:871ab3f050bc9790c977daee9e44cf52e15ee37ab9834567333b939458a5bfb5 \
--control-plane --certificate-key 824d9a0e173a810416b4bca7038fb33b616108c17abcbc5eaef8651f11e3d146
• Execute the kubeadm join command for control plane on master02 and master03.
root@master02:~# kubeadm join lb.example.com:6443 --token cnslau.kd5fjt96jeuzymzb \
--discovery-token-ca-cert-hash sha256:871ab3f050bc9790c977daee9e44cf52e15ee37ab9834567333b939458a5bfb5 \
--control-plane --certificate-key 824d9a0e173a810416b4bca7038fb33b616108c17abcbc5eaef8651f11e3d146
Your output should look like –
This node has joined the cluster and a new control plane instance was created:

*Certificate signing request was sent to apiserver and approval was received.
*The Kubelet was informed of the new secure connection details.
*Control plane (master) label and taint were applied to the new node.
*The Kubernetes control plane instances scaled up.
*A new etcd member was added to the local/stacked etcd cluster.
Now that we have initialized all the masters – we can now work on bootstrapping the worker nodes.
• Log in to worker node01 and worker node02
• Switch to root on both the machines – sudo -i
• Check the output given by the init command on master1 to join worker node –
kubeadm join lb.examle.com:6443 --token cnslau.kd5fjt96jeuzymzb \
--discovery-token-ca-cert-hash sha256:871ab3f050bc9790c977daee9e44cf52e15ee37ab9834567333b939458a5bfb5
• Execute the above command on both the nodes –
• Your output should look like –
This node has joined the cluster:
* Certificate signing request was sent to apiserver and a response was received.
* The Kubelet was informed of the new secure connection details.
Configure kubeconfig on loadbalancer node
Now that we have configured the master and the worker nodes, its now time to configure Kubeconfig (.kube) on the loadbalancer node. It is completely up to you if you want to use the loadbalancer node to setup kubeconfig. kubeconfig can also be setup externally on a separate machine which has access to loadbalancer node. For the purpose of this demo we will use loadbalancer node to host kubeconfig and kubectl.
• Log in to loadbalancer node
• Switch to root – sudo -i
• Create a directory – .kube at $HOME of root
#mkdir -p $HOME/.kube

SCP configuration file from any one master node to loadbalancer node

scp master01:/etc/kubernetes/admin.conf $HOME/.kube/config
NOTE
If you havent setup ssh connection, you can manually download the file /etc/kubernetes/admin.conf from any one of the master and upload it to $HOME/.kube location on the loadbalancer node. Ensure that you change the file name as just config on the loadbalancer node.
• Provide appropriate ownership to the copied file
chown $(id -u):$(id -g) $HOME/.kube/config
Install kubectl binary
snap install kubectl --classic
Verify the cluster
kubectl get nodes

NAME                   STATUS   ROLES                  AGE     VERSION
master01.example.com   NotReady    control-plane,master   7d1h    v1.23.3
master02.example.com   NotReady    control-plane,master   7d      v1.23.3
master03.example.com   NotReady    control-plane,master   6d19h   v1.23.3
node01.example.com     NotReady    <none>                 7d      v1.23.2
node02.example.com     NotReady    <none>                 7d      v1.23.2
Install CNI and complete installation.
We will deploy Flannel CNI on our cluster.
From the loadbalancer node execute below command.
kubectl apply -f https://raw.githubusercontent.com/flannel-io/flannel/master/Documentation/kube-flannel.ymlThis installs CNI component to your cluster.
You can now verify your HA 5 node HA cluster using kubectl from loadbalancer.
kubectl get nodes
NAME                   STATUS   ROLES                  AGE     VERSION
master01.example.com   Ready    control-plane,master   7d1h    v1.23.3
master02.example.com   Ready    control-plane,master   7d      v1.23.3
master03.example.com   Ready    control-plane,master   6d19h   v1.23.3
node01.example.com     Ready    <none>                 7d      v1.23.2
node02.example.com     Ready    <none>                 7d      v1.23.2
Conclusion
This concludes the demo for Multi Master Kubernetes cluster setup using Kubeadm. You can bring down any of the master nodes to check the HA of multi master kubernetes cluster.
Use below link for various cni Addons supported by Kubernetes
https://kubernetes.io/docs/concepts/cluster-administration/addons/